Items Used:
- White card
- A4 White card (folded in half to make A5)
- Creative Expression Foundation Lilac card
- Spellbinders Nestabilities Dies - Labels 20
- Spellbinders Dies - Venetian Motifs
- Heartfelt Creations Dies - Delicate Asters
- Heartfelt Creations Bold Vintage Floret Background Pre-Cut Stamp
- Justrite Large Fancy Sentiments Stamps
- Justrite Kindness Labels 20 Stamps
- Creative Expressions Micro beads
- Habico Self Adhesive Flat Backed Pearls
- Own Stash - Double Sided Adhesive Sheets
- Create and Craft - Iridescent Gems
- Papermania Embossing Powder - Seafoam White
- Tim Holtz Distress Ink - Shaded Lilac
- Versamark Ink Pad
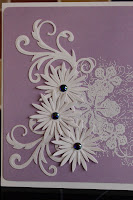
I stamped up Heartfelt Creations Bold Vintage Floret Background Pre-Cut Stamp with my Versamark ink pad and positioned it just off center to the left of the card front then heat embossed with Papermania Embossing Powder in Seafoam White. This is a lovely detailed stamp and embossing it with White embossing powder makes it really stand out.
 Out of White card I cut out two floret swirls from Spellbinders Dies - Venetian Motifs and various sized flowers (3 lrg & 3 med) from Heartfelt Creations Dies - Delicate Asters. I doubled up the aster flowers off setting each one and positioned them to the left side of the stamped image and added the two floret swirls as leaves. To the center of each flower I added Create and Craft - Iridescent Gem in Purple.
Onto White card I stamped one of the designs from Justrite Kindness Labels 20 Stamps and shaded it in using Tim Holtz Distress Ink - Shaded Lilac, I then stamped my sentiment in the center, though it probably would have been better stamping that first, I placed a piece of Double Sided Adhesive Sheet over the top and coated it in Creative Expressions Micro beads, this added some extra texture and a focal point to the card.
I placed this in the top right-hand corner using some double sided adhesive pads to raise it up and give it dimension. as a finishing touch I added some Habico Self Adhesive Flat Backed Pearls in the bottom right-hand corner.
The finished dimensions are 5" x 7".
Thanks for looking, Jacquie xxx


No comments:
Post a Comment
Thank you for leaving me a comment I do appreciate it. I love to read what you think of my creations and I hope you will visit me again.